Training Data GUI
Open GUI
Navigate MATLAB to the GUI folder. Execute training_data_gui in the command window.
Load Images

Specify the following information in the Setting panel.
Folder — Path to the folder storing the images of the nuclear channel.
Image sequences/stacks only. For the Nikon ND2 format, extract the movies into image sequences.
File — Format of image filenames.
Similar to “Filename” in Parameter Generator GUI. Only Frame ID (“%t”) is allowed as variable information.
Example
Example 1. Filename follows 2_1_1_CFP_FrameID.tif. For example, 2_1_1_CFP_4.tif. Type
2_1_1_CFP_%t.tif.Example 2. Filename follows tFrameID.tif. Frame ID has 3 digits. For example, t001.tif. Type
t%03t.tif.Frame — Range of Frame IDs to import.
CMOS — Optional. Path to the MAT file storing the camera dark noises. Leave empty if not available.
Bias — Optional. Path to the MAT file storing the illumination bias. Leave empty if not available.
SegInfo — Path to the folder storing the “Segmentation Info” of the imported images.
Existing — Optional. Path to the MAT file storing an existing training dataset for the imported images. Leave empty if not available.
GUI examines whether the inputs of Folder, File, and Frames match the information stored in the existing dataset. A warning dialog will appear if any mismatch is found.

Output — Path to the folder storing the output.
Click “Import Data” to proceed.
Morphological Training
Objective: Label the cells with representative behaviors.
GUI Interface
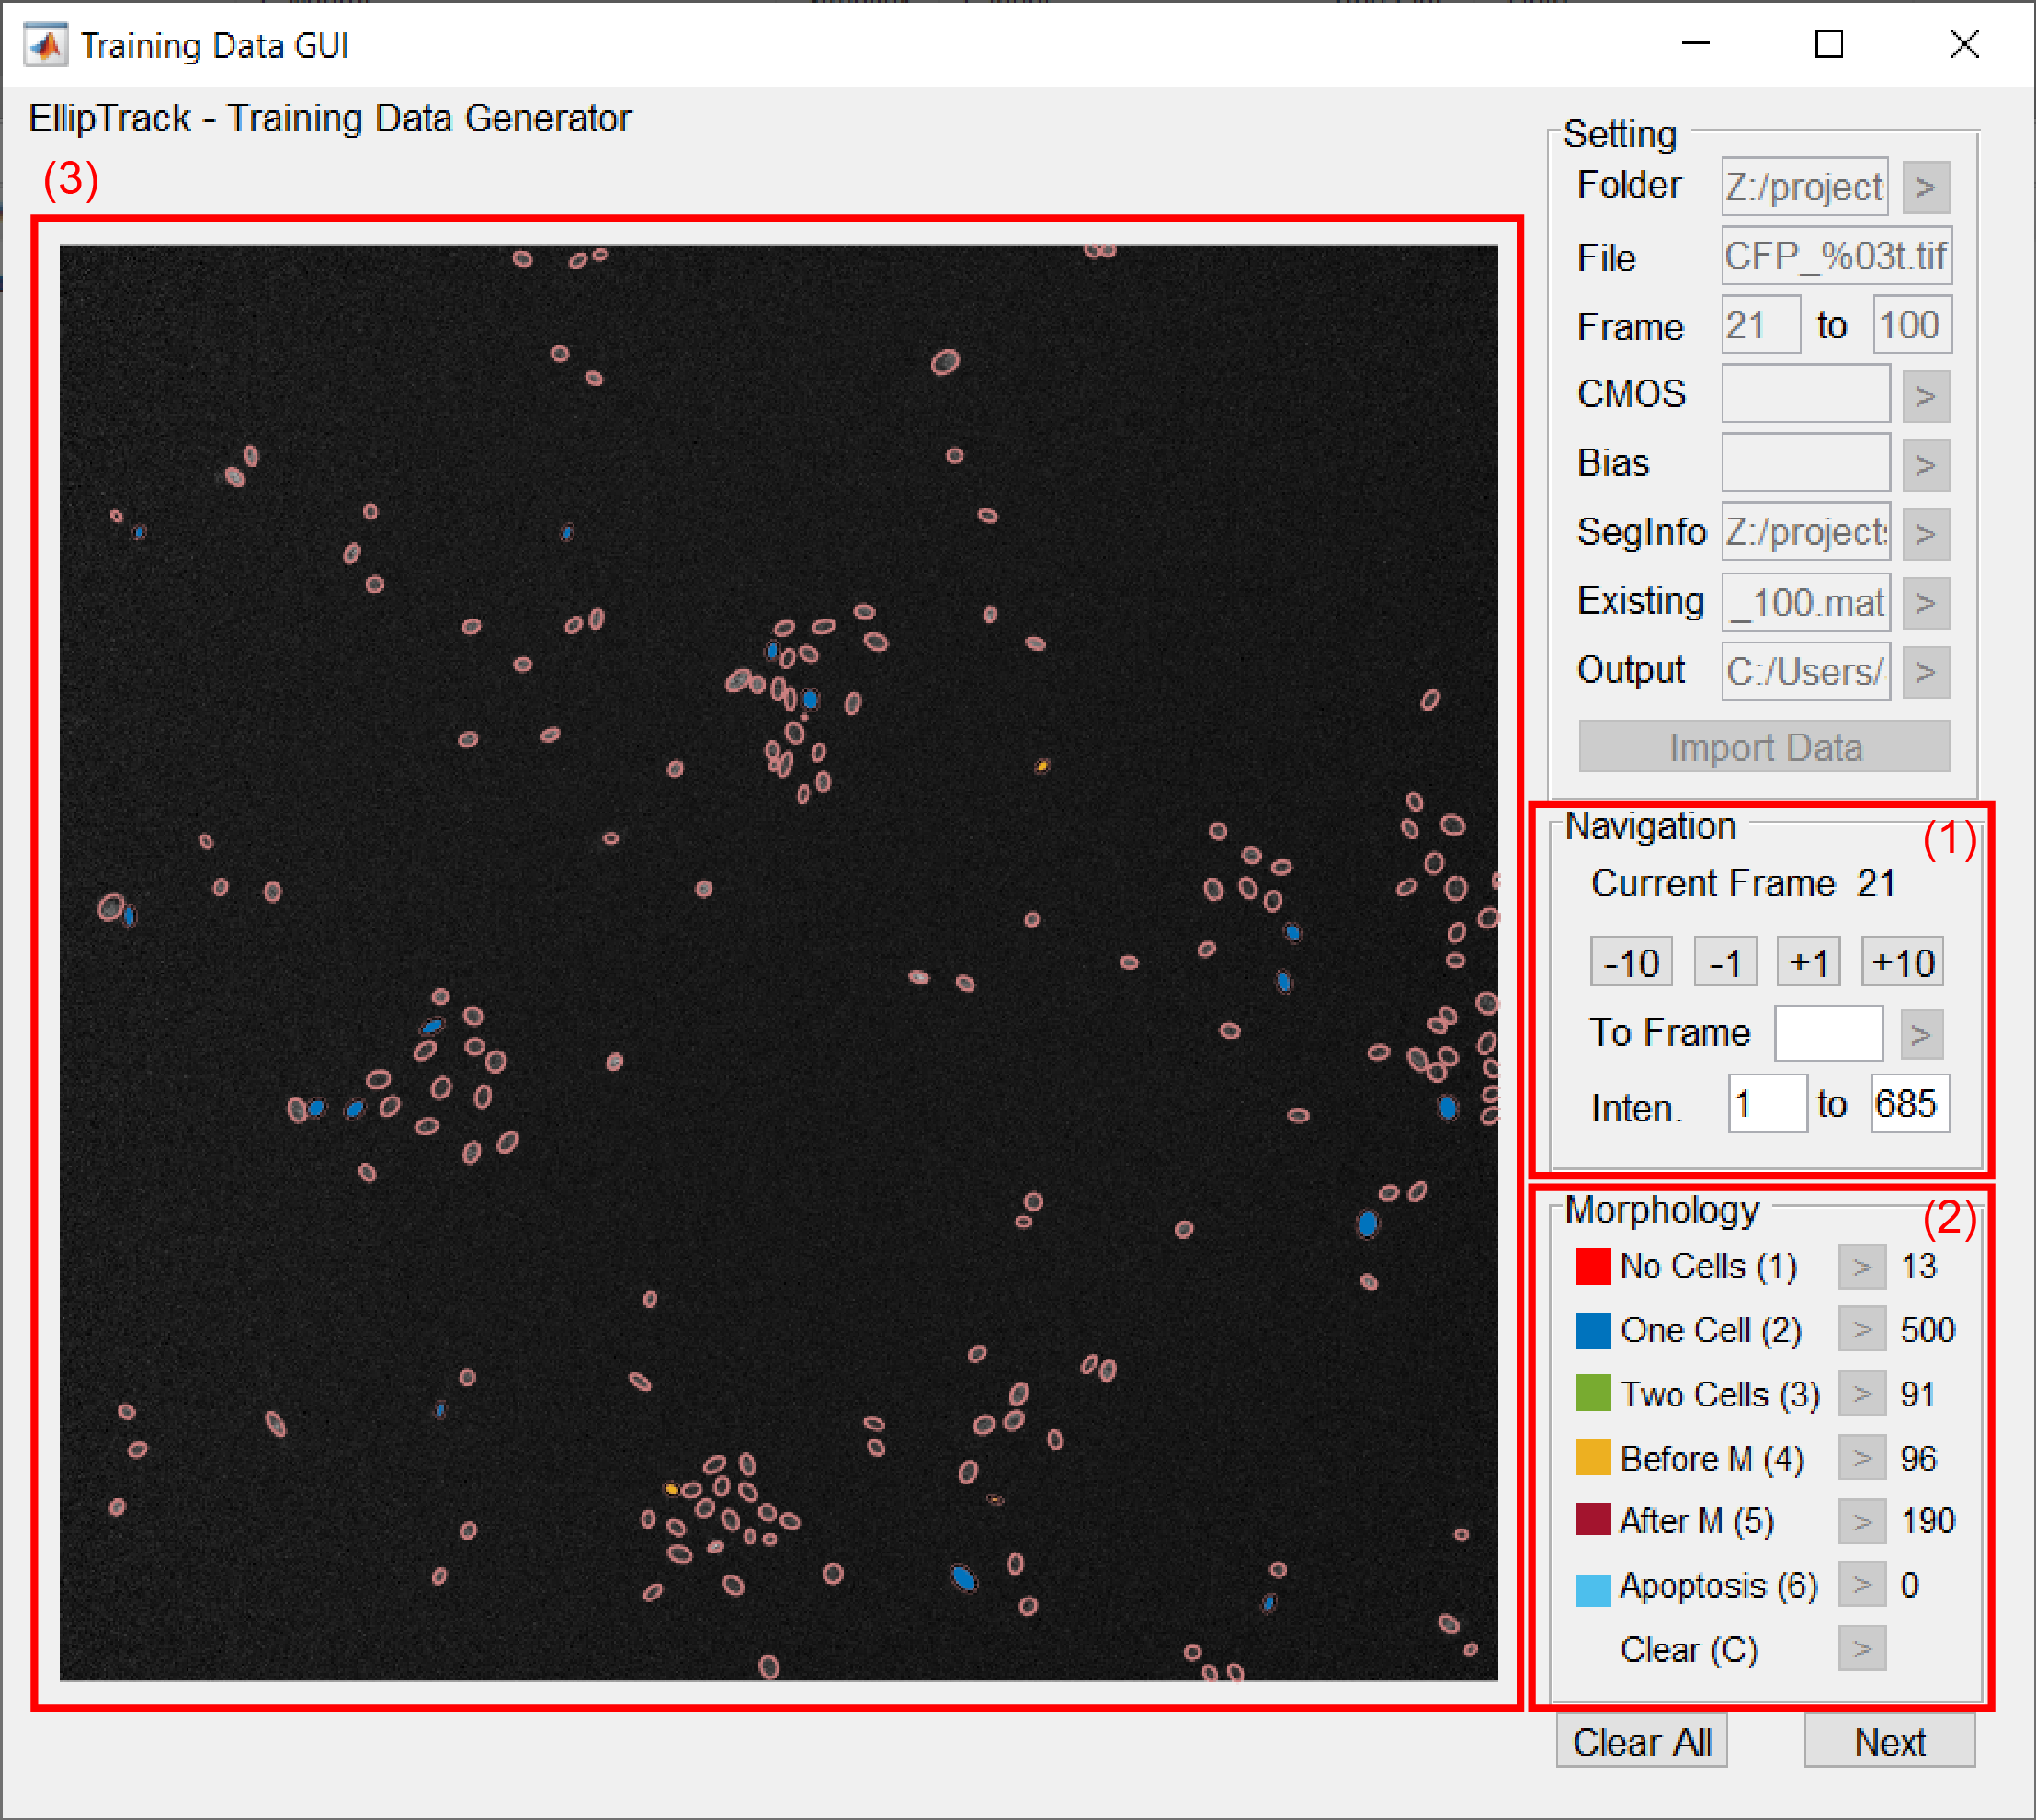
Navigation of Frames.
Current Frame — Frame ID of the image being displayed in the left panel.
Switch Frames — Switch the image being displayed.
Option Operation Forward by 1 Frame Click the “+1” button, press the right arrow key,
or scroll down the mouse wheel.
Backward by 1 Frame Click the “-1” button, press the left arrow key,
or scroll up the mouse wheel.
Forward by 10 Frames Click the “+10” button, or press the up arrow key. Backward by 10 Frames Click the “-10” button, or press the down arrow key. Alternatively, switch to any image by specifying its Frame ID in the “To Frame” text box and clicking “>”.
Intensity — Range of pixel intensities. Specify the lower and upper limits for display.
The default values are the lowest and highest pixel intensities of the imported image. Adjust this range to visualize the dim cell nuclei.
Morphology.
Six events are available. The numbers of recorded ellipses are shown in the last column.
Color Event Description Hotkey Red No Cells Ellipse contains no nucleus. 1 Blue One Cell Ellipse contains one nucleus. 2 Green Two Cells Ellipse contains at least two nuclei. 3 Yellow Before M Mitotic cell. Will divide into two daughter
cells in the next frame.
Assume the ellipse contains one nucleus.
4 Dark Red After M Newly born cell. Mother cell divided
in the previous frame.
Assume the ellipse contains one nucleus.
5 Light Blue Apoptosis Apoptotic cell. Will disappear in the next frame.
Assume the ellipse contains one nucleus.
6 Training result.
Image overlaid by the fitted ellipses. Trained ellipses are highlighted in the symbolic colors of their respective events.
Assign Events

To assign an event, click the ellipse of interest, and then press the event’s hotkey or click its respective “>” button. The ellipse will be highlighted in the symbolic color of this event, and the number of recorded ellipses for this event will increase by one.
Only one event can be assigned to an ellipse. GUI assumes that the ellipses labeled with Before M, After M, or Apoptosis contain only one cell nucleus, and the ellipses labeled with No Cells, One Cell, or Two Cells are neither mitotic, newly born, nor apoptotic.
The selected ellipses are colored in black. To unselect an ellipse, click any other ellipse or navigate to other frames. No training samples will be created from the unselected ellipses.
Modify and Remove Events

To modify an event, click the ellipse of interest, and then select a new event. This ellipse will be highlighted in the symbolic color of the new event. The numbers of recorded ellipses will be adjusted.
To remove an event, click the ellipse of interest, and then press “C” or click the respective “>” button. This ellipse will no longer be highlighted, and the number of recorded ellipses for the old event will decrease by one.
Suggested Strategy
A training dataset should be constructed from every representative segment of the movie. Samples should cover the broad spectra of cell morphology, brightness, and behaviors. For each training dataset, use the following guideline.
| Event | Suggested # Samples |
|---|---|
| No Cells | ~100, less if over-segmentation is rare. |
| One Cell | 200-400 |
| Two Cells | ~100, less if under-segmentation is rare. |
| Before M | As many as possible. Do not label if the cell is under-segmented. |
| After M | As many as possible. Do not label if the cell is under-segmented. |
| Apoptosis | Only label if apoptosis is frequent. Do not label if the cell is under-segmented. |
Minimal Requirement. Label one ellipse. Can be any event.
Click “Next” to proceed.
Motion Training
Objective: Manually label a few cell tracks.
GUI Interface
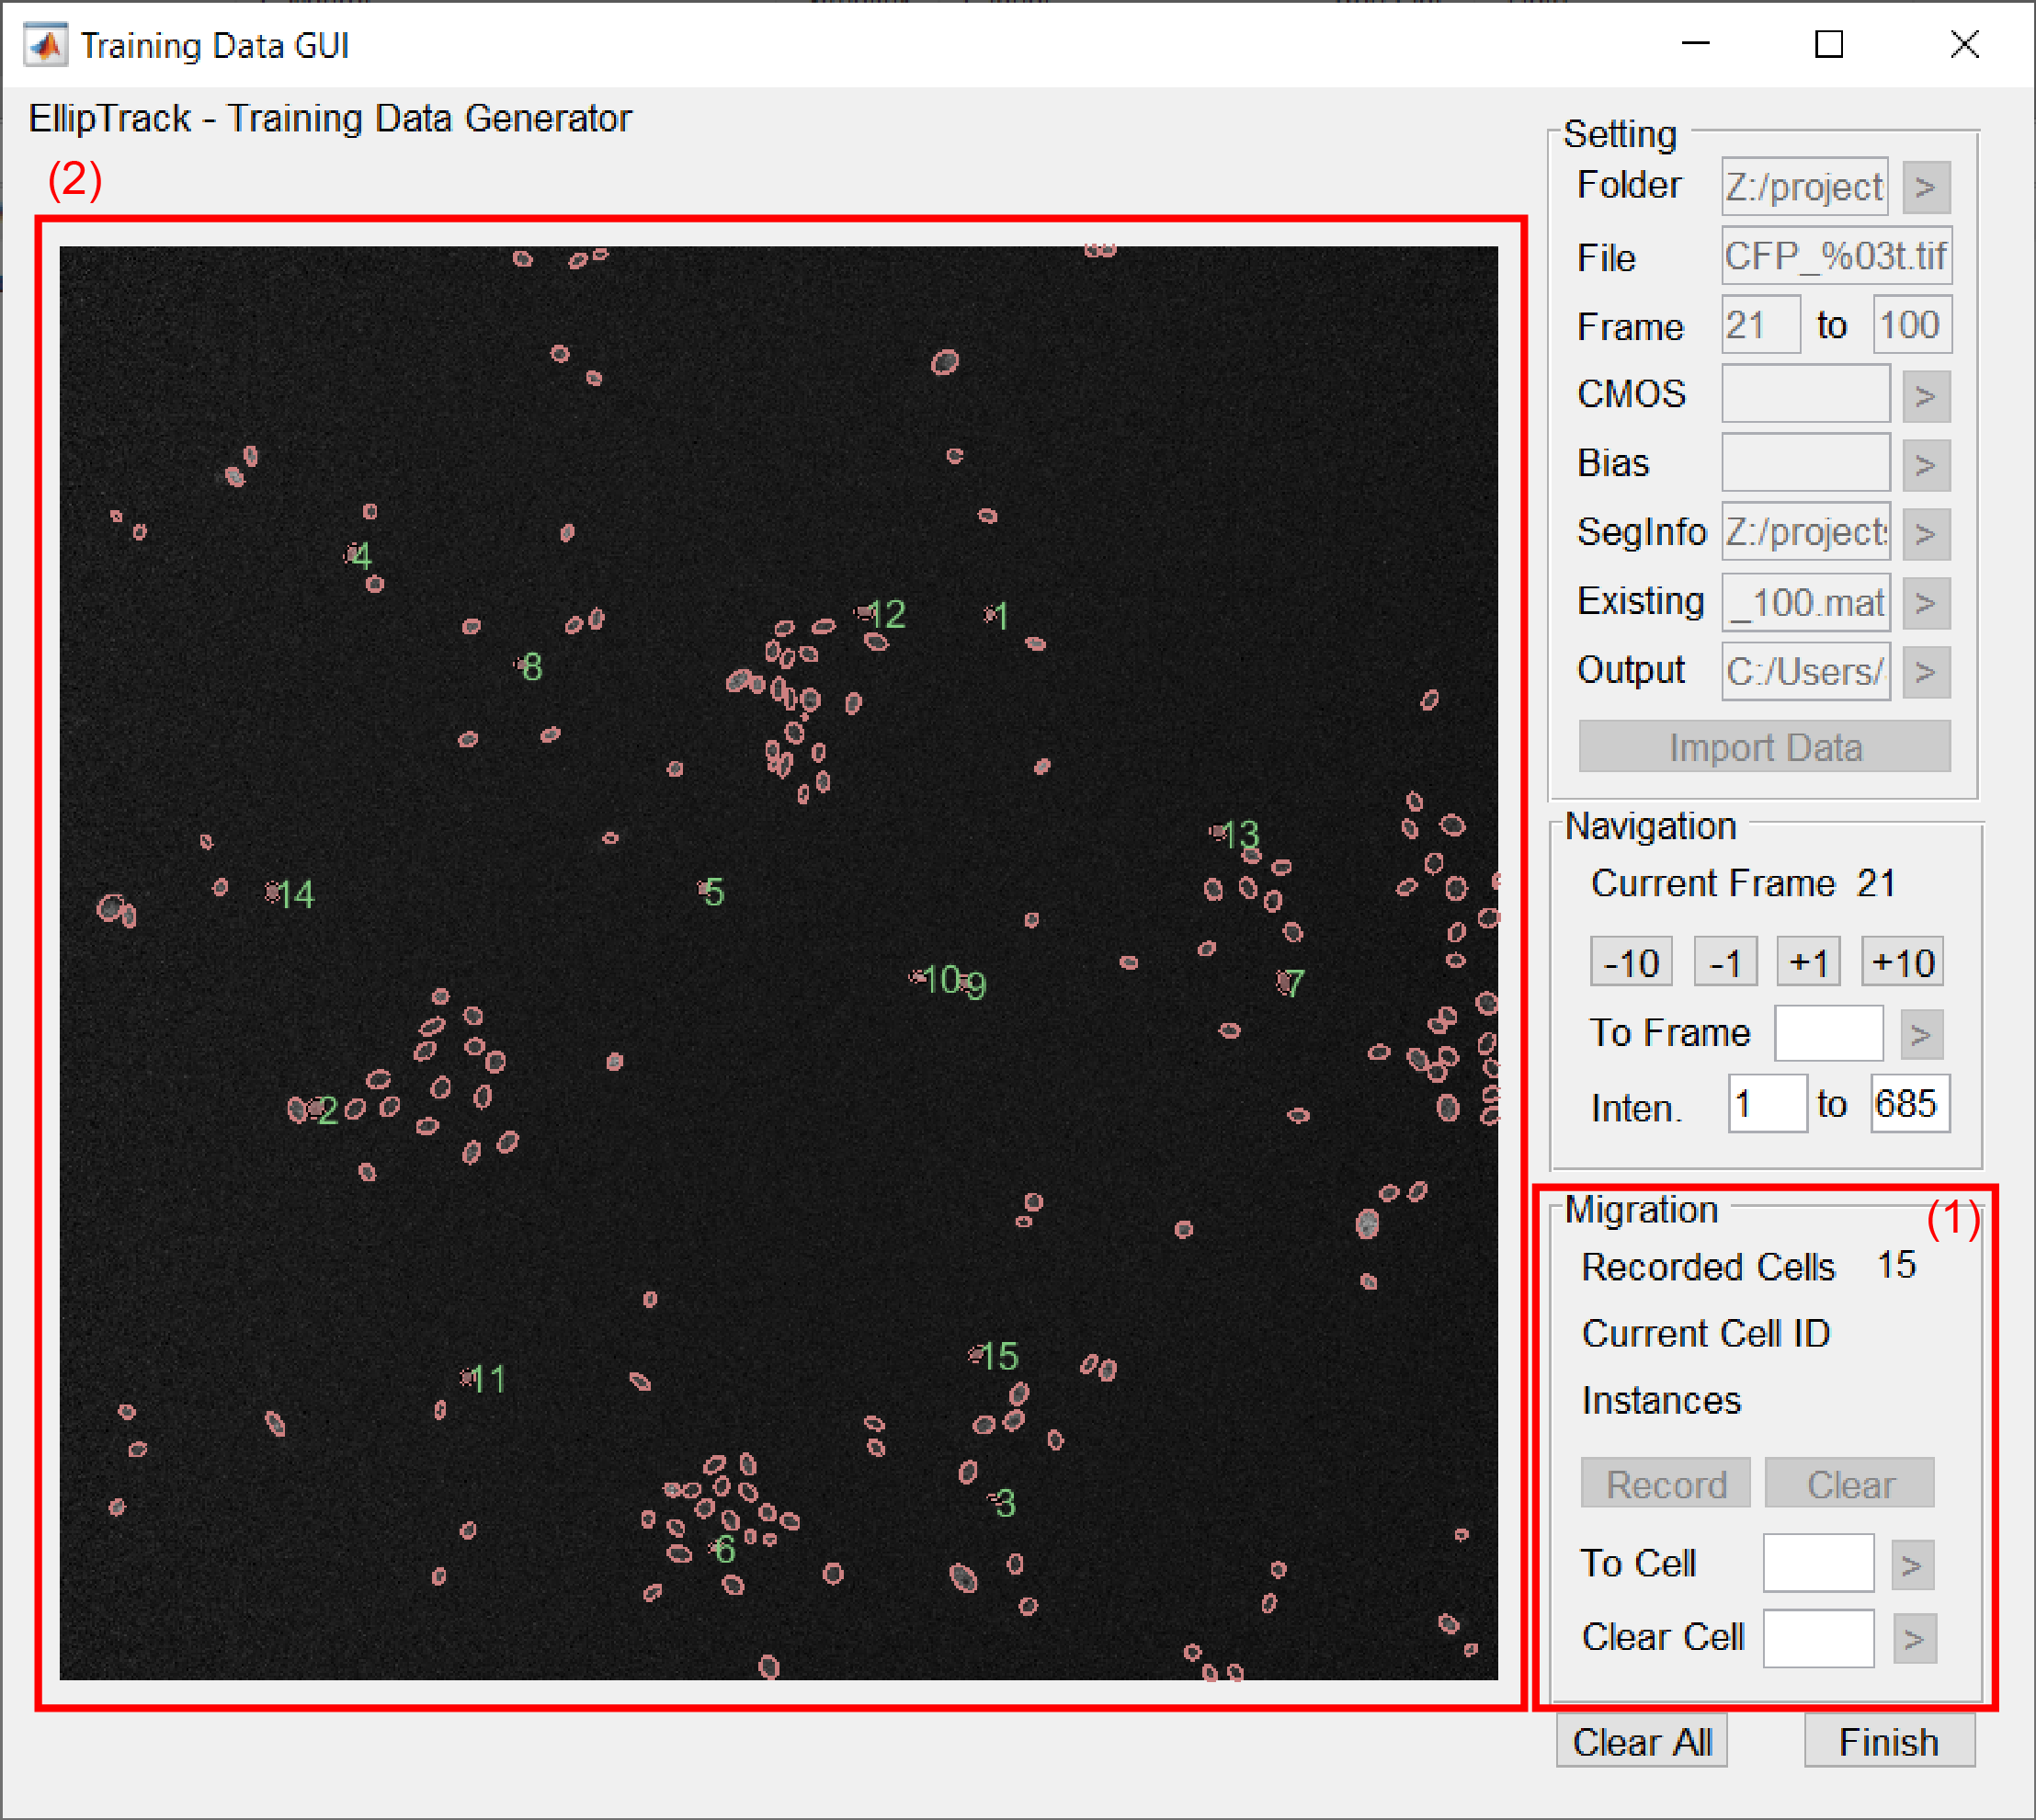
Migration.
Entry Description Recorded Cells Total number of recorded cells. Current Cell ID ID of the cell being recorded. “Record” Button Record a new ellipse for the current cell. “Clear” Button Remove a recorded ellipse for the current cell. To Cell ID Create a new cell or switch to an existing cell. Clear Cell Remove all recorded ellipses of a cell. Training result.
Image overlaid by the fitted ellipses. The trained ellipses of the current cell are colored in red. Other trained ellipses are colored in light red. Cell IDs are plotted next to the trained ellipses.
Record Cells

To create a new cell or switch to an existing cell, type a Cell ID in the To Cell ID text box and click “>”. To record an ellipse, click the ellipse of interest, and then press “R” or click the “Record” button. This ellipse will be highlighted in red, and its Cell ID will be displayed next to it. The number of instances will increase by one.
Remove Recording
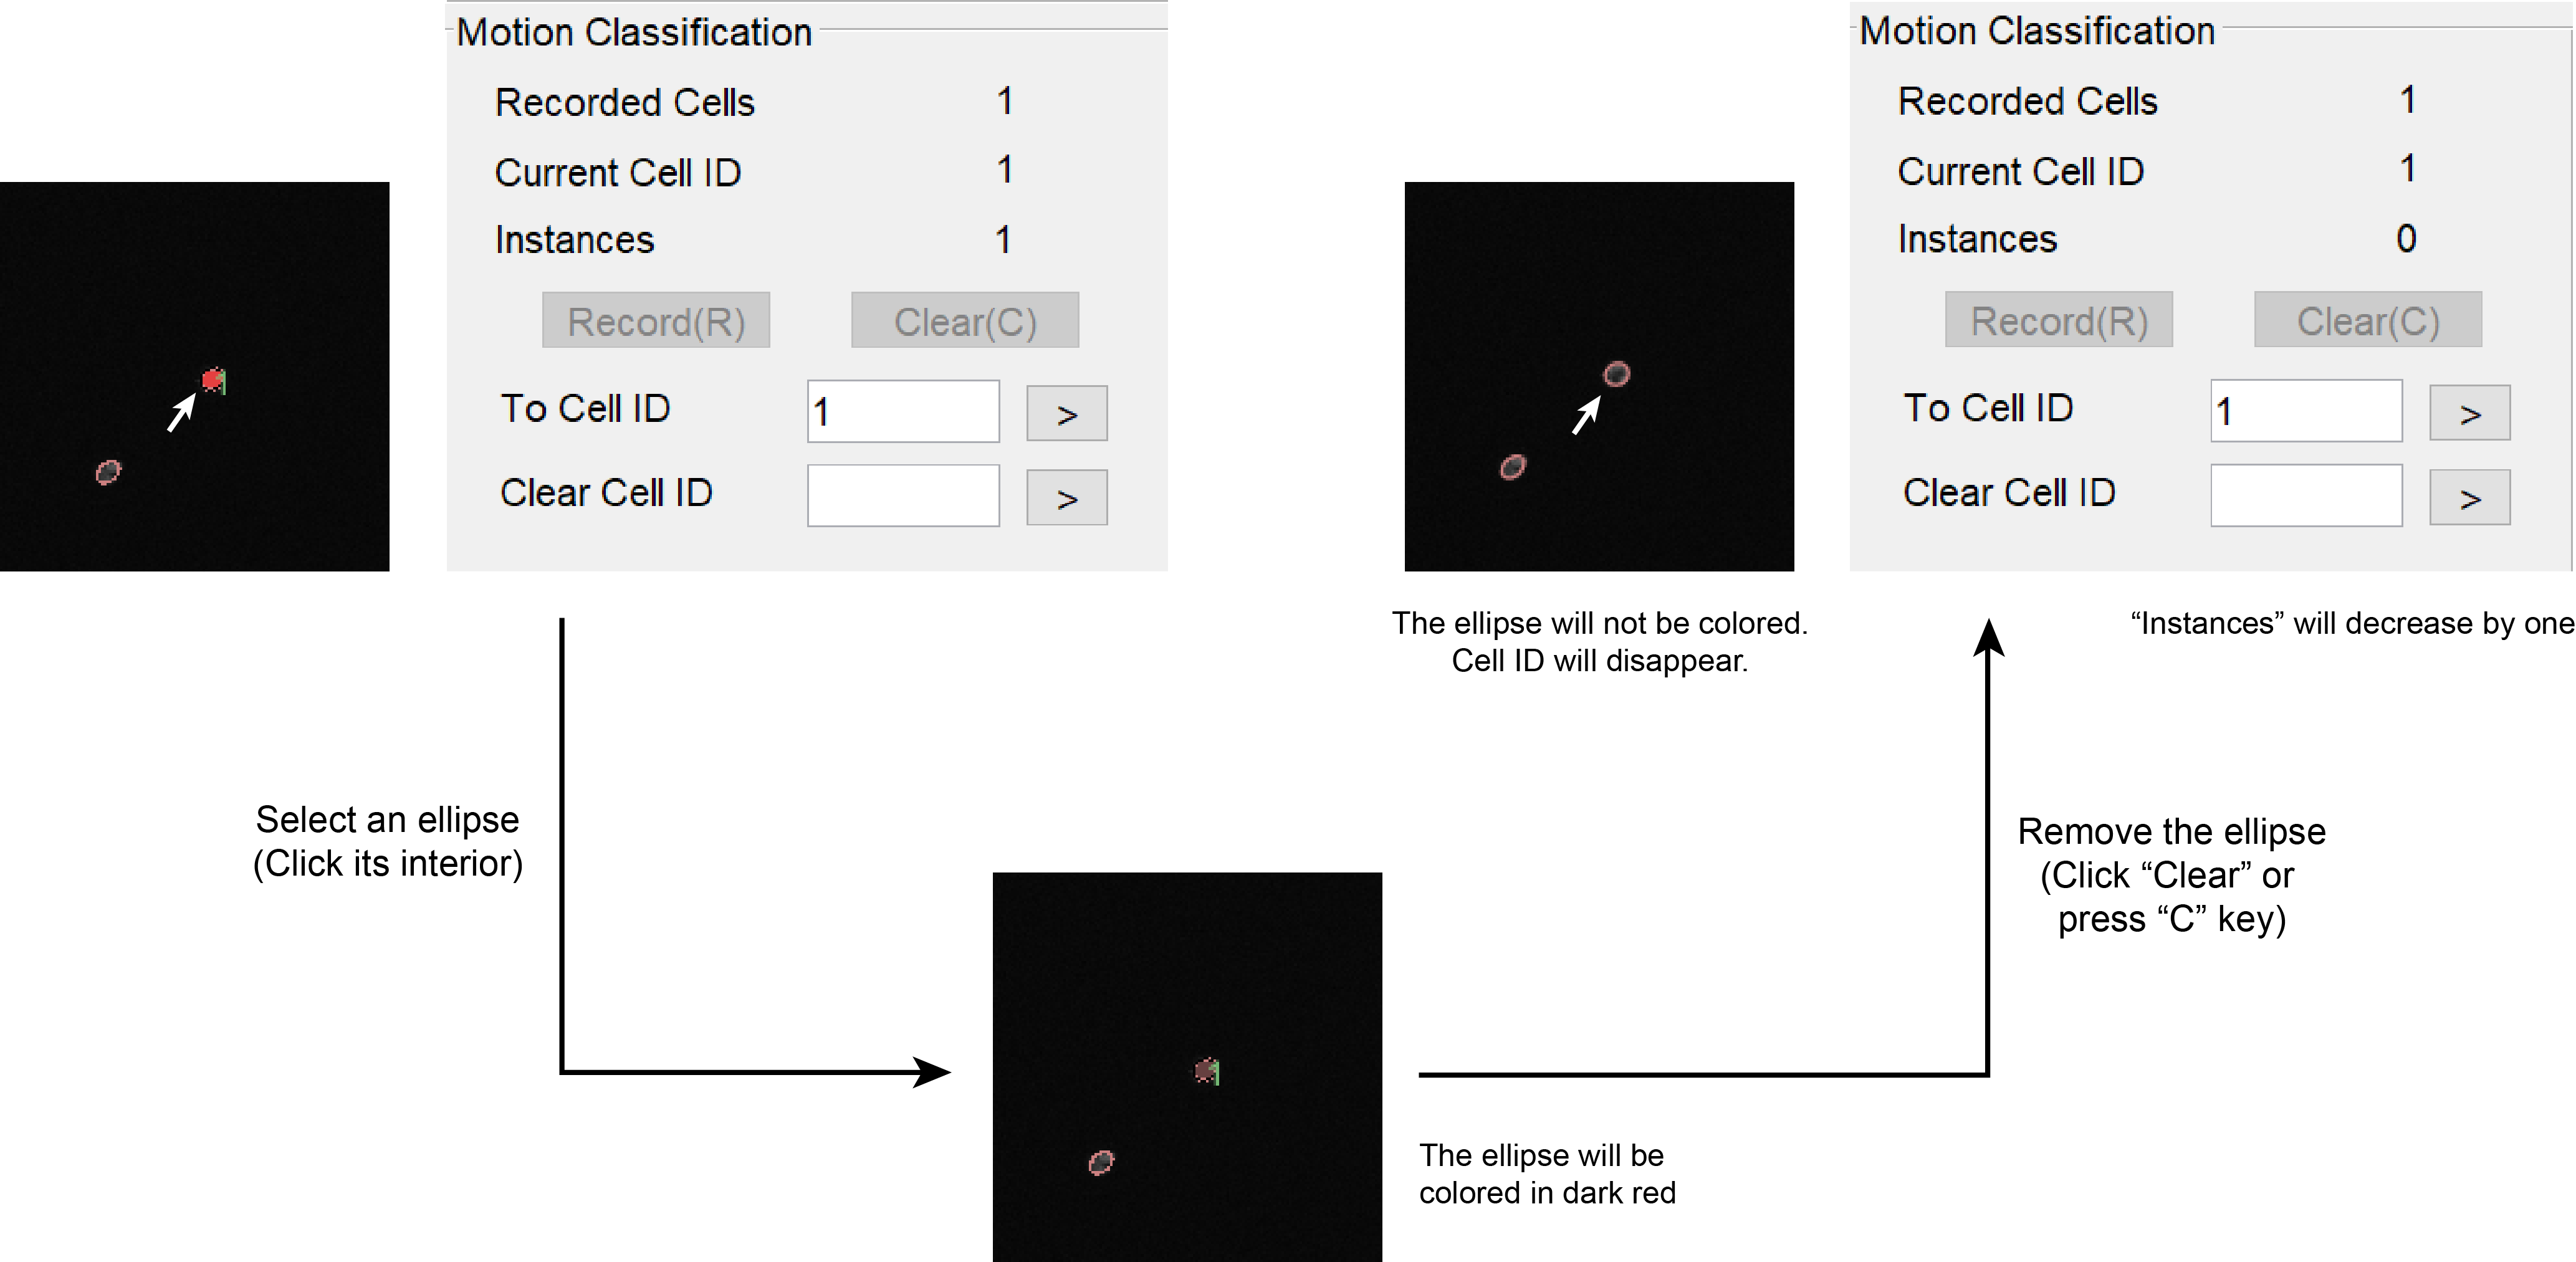
To remove a recorded ellipse, click the ellipse of interest, and then press “C” or click the “Clear” button. This ellipse will no longer be highlighted, and its Cell ID will disappear. The number of instances will decrease by one.
To remove all the recorded ellipse for a cell, type its Cell ID in the Clear Cell text box and click “>”.
Suggested Strategy
A training dataset should be constructed from every representative segment of the movie. Label 10-15 cells for each training dataset. These cells should cover the broad spectra of cell morphology, brightness and behaviors. Use the following guideline.
| Situation | Suggested Action |
|---|---|
| Cell is under-segmented. | Label the under-segmented ellipse. |
| Cell is over-segmented. | Label one of the over-segmented ellipses. |
| Cell is not detected. | Skip the frame. |
| Cell undergoes mitosis. | Label one of the daughter cell. |
| Cell undergoes apoptosis. | Stop labeling the cell. |
| Cell moves out of the field of view. | Stop labeling the cell. |
Minimal Requirement. Label 3 cells. 3 ellipses per cell.
Save Training Dataset
Click “Finish” to finish training. A MAT file called training_data_FromFrameID_ToFrameID.mat will be generated in the output folder. FromFrameID and ToFrameID refer to the first and last imported images.